Back in May 2019, I wrote an article about the Windows Subsystem for Linux, giving a quick overview of what it is and how to set it up. Here’s how to update your old WSL distros to use WSL 2 and to make any future installs use WSL 2 by default.
Shortly after the original post, Microsoft began previewing the next iteration of WSL, unsurprisingly called Windows Subsystem for Linux 2 (WSL 2). This was initially available through the Windows Insider program, but now, with the release of Windows 10 version 2004 (or 20H1 or 19041.329), WSL 2 has gone mainstream.
(A quick note: if you’ve not used WSL before, read the previous article to find out how to enable WSL)
Enable Windows Virtual Machine Platform
A new requirement for WSL 2 is the Virtual Machine Platform. Assuming that WSL has already been previously enabled, the next thing to do is to enable this feature in Windows. This can be done either with PowerShell or through the control panel.
PowerShell: Open PowerShell as Administrator and run
Enable-WindowsOptionalFeature -Online -FeatureName VirtualMachinePlatform
Control Panel:
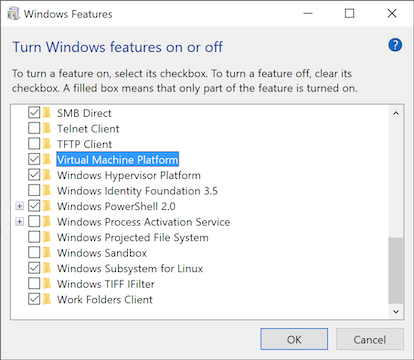
Open the Start menu and start typing ‘Turn Windows features on or off’. Once it appears, click on the icon to launch its control panel. Scroll down to ‘Virtual Machine Platform’ and click it to enable. Hit OK and the feature is installed.
After it’s installed and if required, reboot the PC.
Update the WSL 2 Linux Kernel
When I tried to update the distros, Windows said that I needed to first update the Linux kernel. I found a post on the Microsoft Docs site, explaining how to do this:
https://docs.microsoft.com/en-gb/windows/wsl/wsl2-kernel
Update your distros
Once the kernel is updated, open PowerShell and run the following command to list your available distros and show which WSL version they are currently using:
wsl -l -v
This will output something similar to:
NAME            STATE       VERSION
Ubuntu-18.04    Stopped     1
WLinux          Stopped     1
Use the following command to update a distro to WSL 2 (the distro name is listed under NAME, in this example the name is WLinux):
wsl --set-version WLinux 2
It takes a little while to update.
Once it has update, you can run the wsl -l -v command again to see the WSL versions:
NAME            STATE       VERSION
Ubuntu-18.04    Stopped     1
WLinux          Stopped     2
Make WSL 2 the default
To make future distros install using WSL 2, use this PowerShell command:
wsl --set-default-version 2
So, what’s the difference between WSL and WSL 2?
With WSL, Microsoft provided a translation layer between the Linux application and the Windows Kernel, effectively translating Linux kernel calls into the Windows kernel equivalents. This was a good start, but led to performance issues, especially when an application accessed the file system.
With WSL 2, Microsoft has written its own Linux kernel that runs within Hyper-V. The distros are installed onto a virtual disk, formatted to a Linux filesystem. The combination of real kernel and Linux filesystem gives quite a performance increase, with Microsoft saying up to 20 times the read/write performance of the original WSL.
What next?
Scott Hanselman has a great video discussing how to use the Windows Subsystem for Linux, with a neat bit about how you can use VS Code on Windows to write and run code on your Linux distro.